This article shows you step by step how to draw a square in central perspective with one vanishing point, in the context of technical drawing.
Linear perspective is a graphical representation technique for accurately drawing three-dimensional objects. In this text, we will show the entire graphical process of central perspective for a flat geometric construction and offer practical tips to ensure precise results in technical drawings.
What is linear (central) perspective?
Linear perspective, also known as conic perspective, is a three-dimensional representation technique that allows for realistic visualization of drawings, imitating human eyes.
This technique uses vanishing points in its drawing procedure to create the illusion of depth. In short, parallel lines converge on one point in the case of central perspective or more points in lateral or aerial perspective. These points are located at specific positions in space, generating a realistic spatial view of objects, environments, and landscapes.
Construction of the square in central perspective
Here is the step-by-step graphic procedure for constructing the perspective of a square.
Basic elements of central perspective
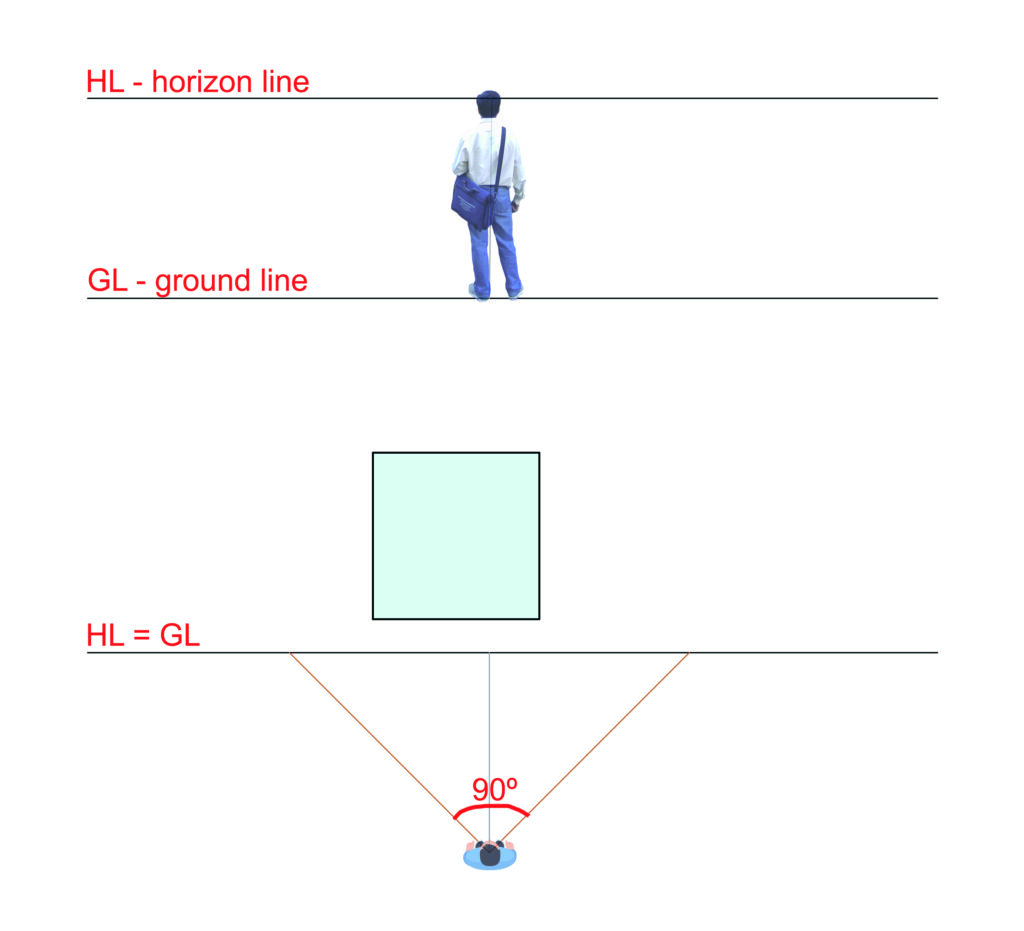
To begin, besides drawing the square with its actual dimensions (or in a certain scale), it is important to draw a horizontal line that represents the plane where the perspective of the square is projected. Figuratively, this line is like a transparent surface positioned between the observer and the observed object.
In other words, as shown in Figure 1, the basic elements to start the technical drawing of central perspective are, in the floor plan:
a) drawing of the object (square);
b) position of the observer at a certain (free) distance from the object;
c) projection plane line between the object and the observer (HL=GL line).
In perspective (in the upper part of Figure 1):
a) ground line (GL);
b) horizon line (HL).
The distance between the ground line and the horizon line should be equal to the observer’s eye level, in this case, about 1.7m. If the observer is sitting, this distance should be shorter. If the observer is looking from a window in a building, the distance will be much greater, as the horizon line always corresponds to the eye level of the person viewing the perspective.
Vanishing points and lines
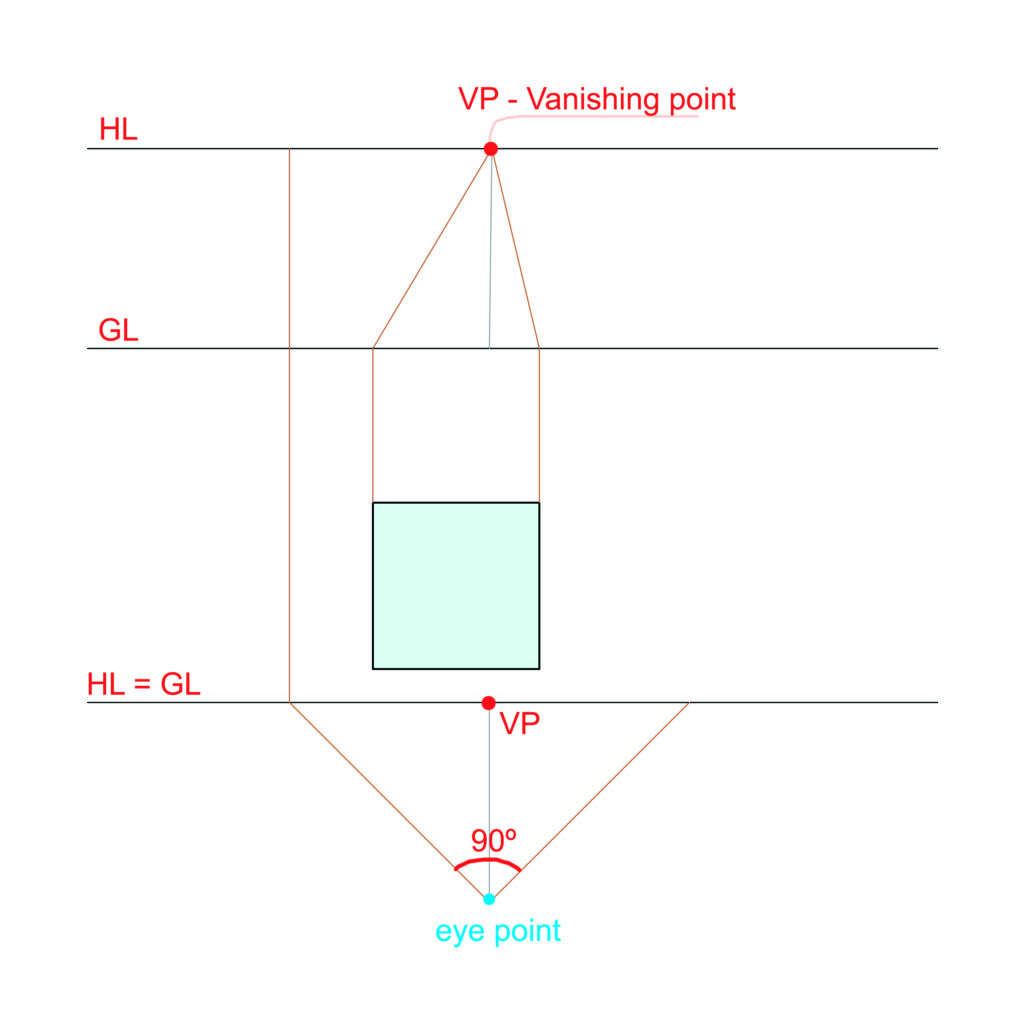
Next, from the viewpoint (the observer), we know that the vanishing point is located on the horizon line, and is exactly the same height as the viewpoint. Figure 2 shows the eye point on a floor plan and the vanishing point. In the case of central perspective there is only 1 vanishing point.
Now, we can draw 2 vertical lines from the corners of the square to the ground line, having the real dimension of the square’s side at the ground line. With this, we can draw the vanishing lines from the ground line to the vanishing point, so we can obtain the direction of the 2 sides of the square in central perspective.
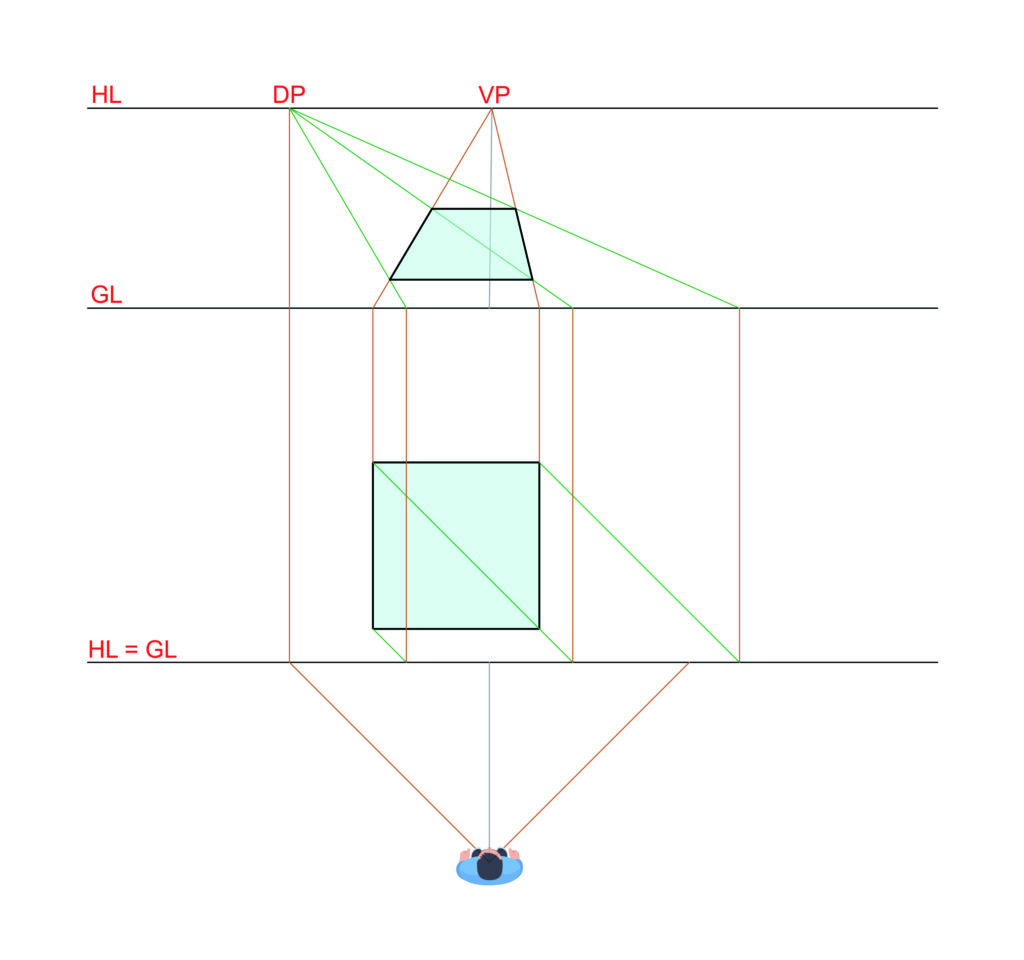
Distance point and auxiliary lines to create the square in central perspective
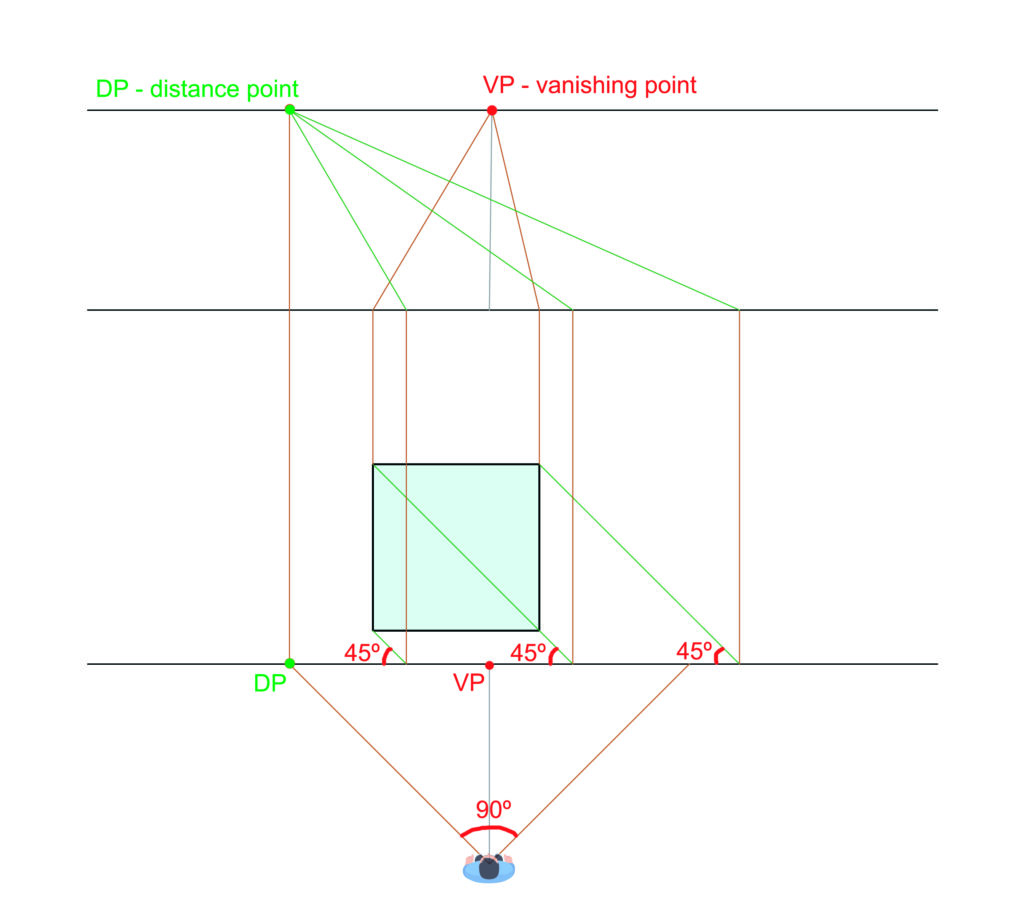
Moving on, to define the depth of the square in perspective, we need to find another point located on the horizon line called the distance point (in figure 3: DP – distance point).
To do this, let’s follow this procedure according to figure 3:
a) From the ground plan viewpoint, we must draw 2 lines at an angle of 90º, which represents the diameter of the imaginary visual cone, to the projection plane.
b) Mark the distance point on the horizon line, corresponding to the floor plan. In this case we could mark 2 distance points, but for this square exercise, only 1 is enough.
Then, on the ground plan, we can draw lines inclined at 45º from the corners of the square to the projection plane, and rebound the points found to the ground line.
Finally, we can draw the auxiliary lines from these points to the distance point (green lines in figure 3).
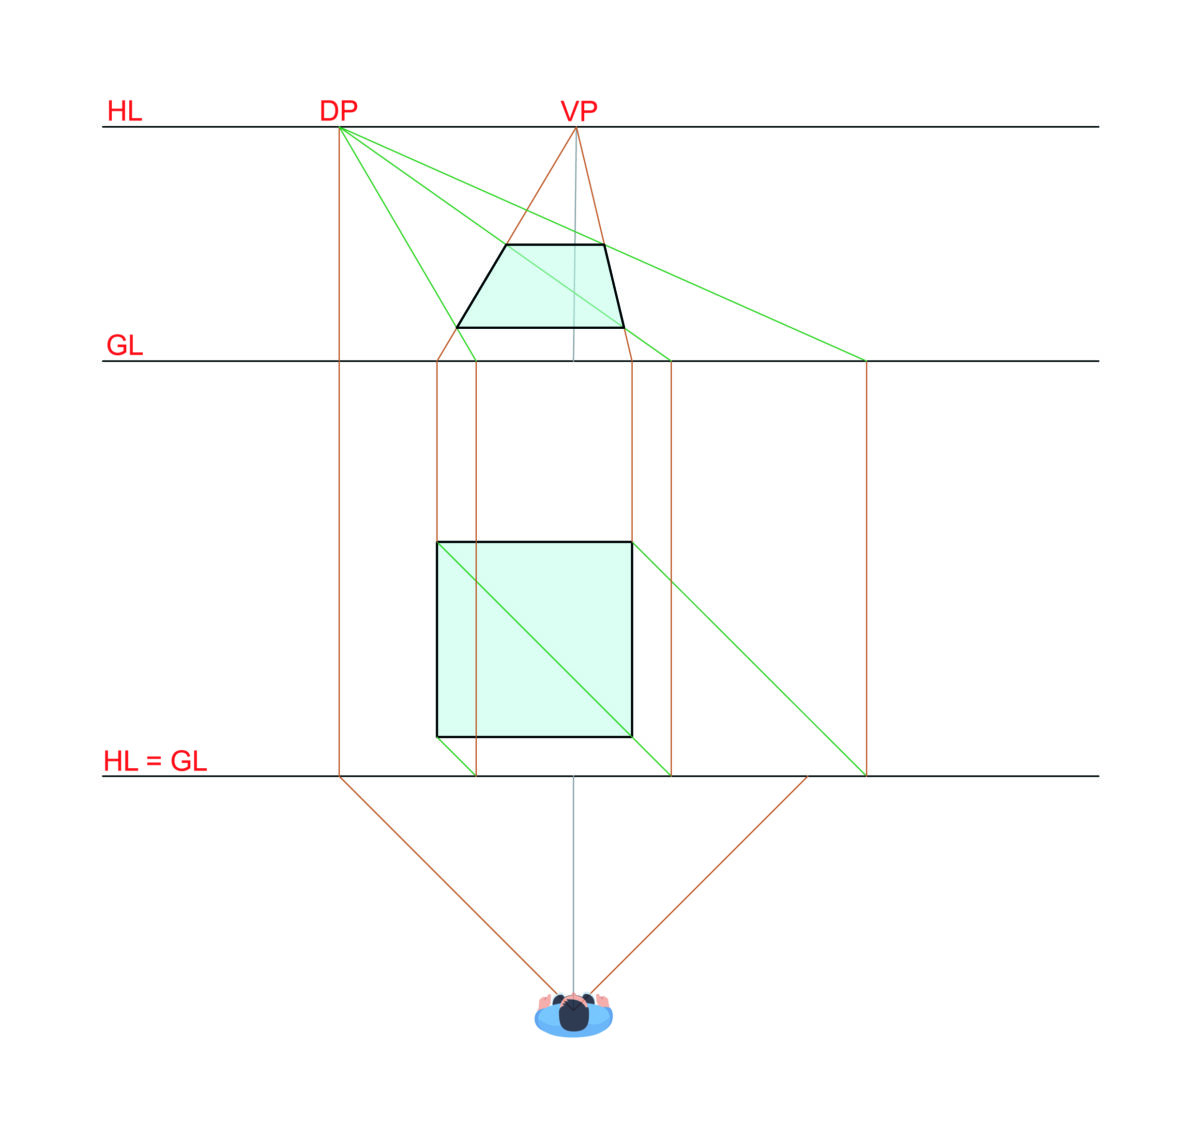
To complete the drawing, with all these graphic elements we can finally draw the square in central perspective, linking the 4 points of intersection between the vanishing lines and auxiliary lines (figure 4).
Conclusion
Although I have presented the complete process of constructing a square in perspective, the main purpose of this article was to show specifically how to find the depth of objects in perspective, using the distance point and the auxiliary lines. This is because it is at this point of deciding the depth that most errors happen in technical drawings of central perspective with 1 vanishing point.
This post has only shown how to construct the perspective of a flat geometric shape, but most of the time it is necessary to complement this procedure with a solid geometric shape. In this case, the base of the square can be transformed into a cube, parallelepiped or pyramid. We’ll show you how to do this in subsequent articles.