
The construction of an outdoor concrete and grass strip flooring presents an appealing option for establishing an outdoor space that blends the durability of concrete with the natural beauty of grass. This flooring type finds frequent application in areas such as sidewalks, patios, and recreational spaces. The steps involved in building this type of flooring follow these stages:
Ground Preparation
The initial phase involves preparing the ground. This encompasses removing any existing vegetation, loose rocks, and other debris. It is necessary to level the ground to ensure an uniform surface for the floor.
Marking Strips for Concrete and Grass Flooring
With the ground prepared, mark the lines where you will install the concrete strips. So that, you can employ stakes, ropes, or any appropriate tool to ensure straight lines and accurate proportions.
However, the measurements and distances between the strips should vary based on the available space and the desired aesthetic effect. For comfort and functionality purposes, it is recommended to maintain a distance between the strips of less than 20cm (example in figure 1).

Dig ditches
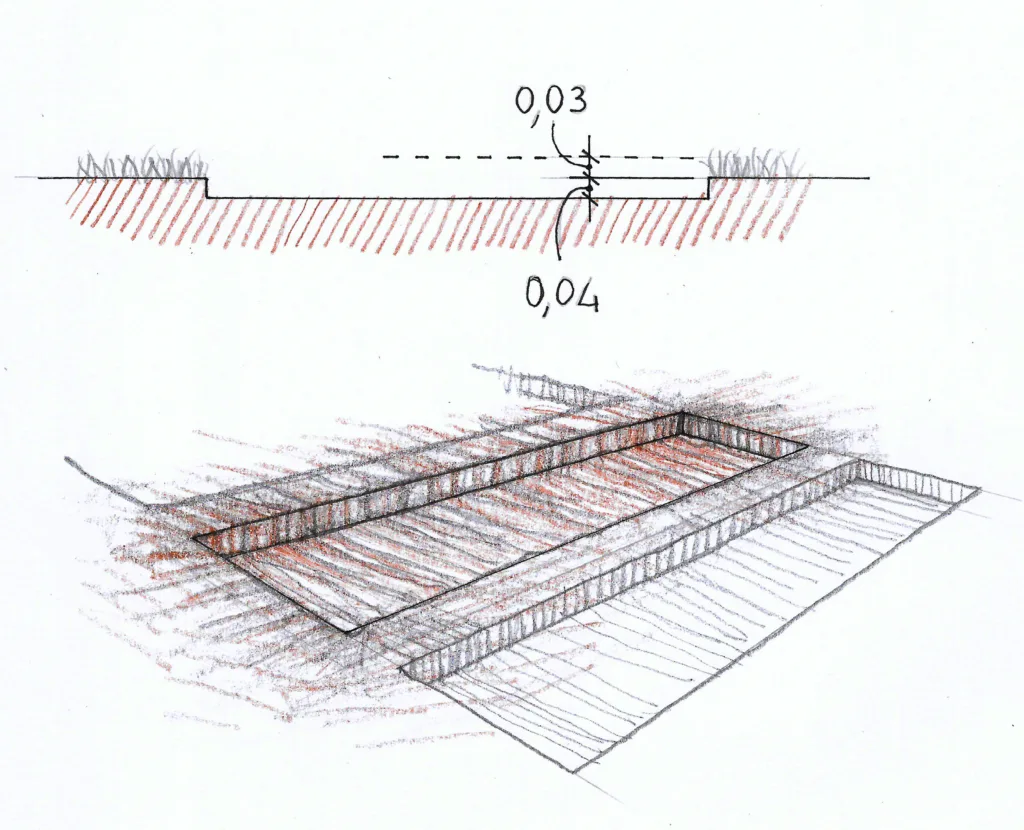
Dig ditches into the ground, removing the soil where you will place the concrete strips. The depth and width of the ditches will depend on the specific project, but usually they are deep enough to accommodate the thickness of the concrete and grass. In this example, the depth of the ditch is 4 cm, while the concrete strip will be 3 cm above ground level (figure 2).
In addition, it is essential to ensure proper soil compaction in the areas where you will install the strips.
Installation of concrete and grass flooring forms
Next, place wooden forms along the excavated ditches (figure 3). By doing so, these forms will help contain the concrete during the pouring and leveling process. Make sure the forms are firmly anchored and leveled to ensure proper embedment of the concrete.
Base Preparation
Then, before pouring the concrete, prepare the base of the ditch by adding a layer of compacted granular base material (figure 3). In this way, this step helps to establish a solid surface for the concrete and aids drainage.

Installing Reinforcement
In addition, introduce reinforcement into the prepared ditches (illustrated in figure 4). This typically entails positioning either steel mesh or steel bars within the area earmarked for concrete pouring. The reinforcement plays a pivotal role in distributing tensions within the concrete, thereby enhancing its strength and thwarting undesirable cracks.

Pouring and Leveling Concrete
Next, pour the concrete into the trenches between the forms, directly onto the reinforcement (as illustrated in figure 4). To obtain a smoother strip surface, apply a layer of leveling mortar. Use an aluminum ruler to ensure precise leveling, thus obtaining a consistently even surface.”

Concrete Curing
Proper curing is essential to ensure concrete’s resilience and longevity. This entails maintaining the concrete moist and shielded from direct sunlight for several days post-pouring. Achieve this by either lightly spraying water or utilizing tarps to prevent excessive moisture evaporation.
Grass Installation
Once the concrete has thoroughly cured, it is time to remove the forms and install grass in the open areas (figure 6). This can be executed through seeding grass or employing pre-cultivated sod. Upon grass installation, the concrete strips will be flush with the grass, forging a seamless surface.
Following grass installation, impeccable upkeep is pivotal. This encompasses regular watering, steering clear of heavy traffic on newly installed areas, and providing the necessary care to foster healthy grass growth.

By adhering to these steps, you will be adept at erecting an outdoor concrete and grass strip flooring that is both robust and visually pleasing.
Figure 7 presents a floor plan and cross-section depicting the construction specifics, including measurements and materials, of the concrete and grass strip flooring.

Legend to Figure
1 – Plant soil
2 – Grass
3 – Compacted soil
4 – Gravel bed for reinforcement leveling
5 – Fine steel rebar reinforcement
6 – Lean concrete
7 – Self-leveling mortar
Read the Portuguese version of this article here.